|
Creating an automated email campaign can seem daunting. You have to consider multiple factors that can make or break your conversions. At the same time, you have to do this while balancing your customers’ needs. Then there’s the need to ensure your automated email series addresses every stage of the buyer’s journey. To make the process easier, we’ve put together this guide. Follow these email automation workflow best practices for optimal results.: 6 email automation best practices to followReady to jump on the email automation bandwagon? Follow these six email automation best practices to reach your subscribers with the right emails at the right time: 1. Set goals and map your automated workflowSetting up an automated email workflow is pointless if you don’t know what you want to achieve. Think about it. How else will you gauge the effectiveness of your automated email sequences without marketing goals? Your goals determine the type of automation workflows you set up. For example, an email sequence whose goal is to drive sales will look different when compared to one that exists to onboard new customers. Here are other automated email workflow goals you might have:
To ensure the best results, your automated workflows and goals should align with every stage of the customer journey. That’s why creating a customer journey map helps. Think of the customer journey map as a visual representation of the stages your customer goes through when interacting with your brand. Essentially, it allows you to visualize your customer’s specific points of interaction with your brand at every stage. 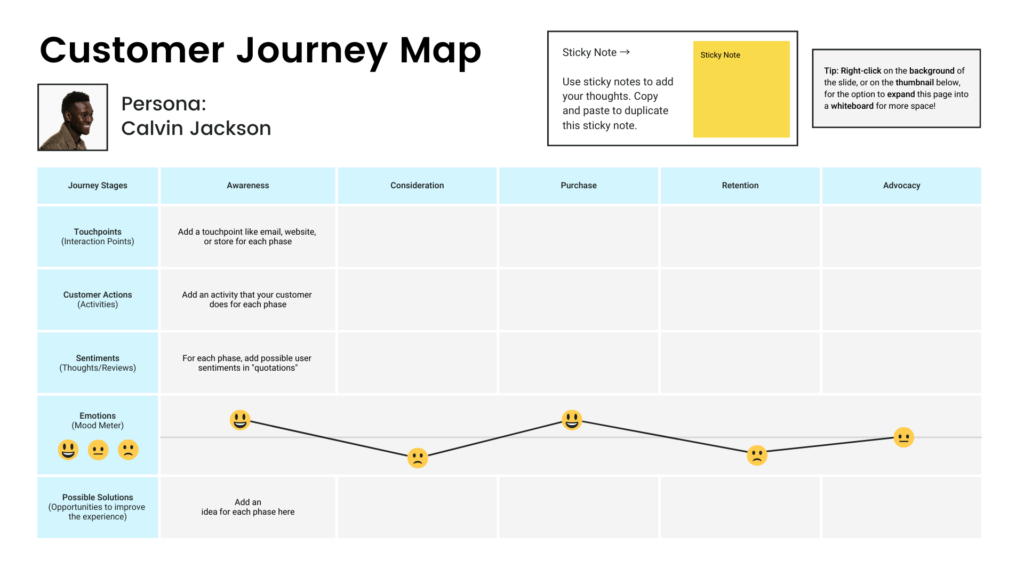
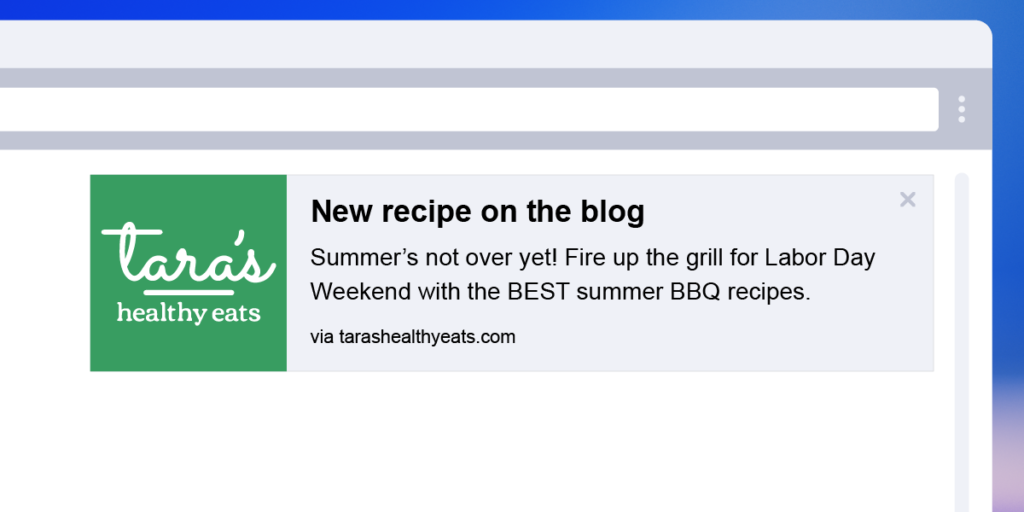
The main benefit of this email automation strategy is that it can boost your customer retention rates. When you combine goals with a customer journey map, you can deliver timely messages that resonate with your customers. Additionally, when you analyze your automation workflows against goals, you can identify the factors that impede desirable user behavior. This can help you finetune your email workflows and help customers progress through their journeys. 2. Trigger emails on customer behaviorWhen creating a sequence of emails, automate them to send based on specific customer actions and inactions. Behavioral triggers refer to email sequences that activate in response to the recipient’s actions. Common behaviors that can fire off such email workflows include:
In the image below, Sony sends a trigger email in response to an abandoned cart from its Playstation Store: 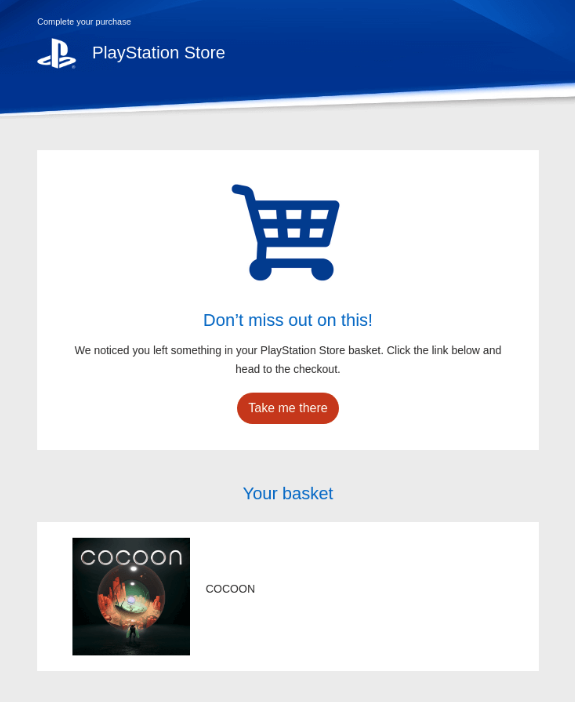
Meanwhile, time-based triggers occur in response to inaction. For example, you can set up an email sequence that triggers after a user has been inactive for a specified period. The content, calls to action, and aim of each of the individual emails in the sequence will be to win back the customer. Triggered emails are essential because they let you speak to the customer at specific points in their journey. That helps enhance the customer experience. Additionally, trigger emails target specific customer journey stages. So, they essentially lead customers toward taking a desired action. 3. Incorporate follow-ups in the automated campaignsUnfortunately, emailing your target audience once won’t be enough to get them to take your desired action. It doesn’t even matter whether they’ve expressed a strong interest in your products or services. Life’s distractions could still steal their focus away and hurt your chances of making a sale or nurturing a lead. So, incorporate follow-ups into your automated campaigns. This entails contacting a customer who has stopped progressing through their customer journey. For instance, the customer may have abandoned their shopping cart at checkout or registered for a webinar but failed to attend. Whatever the case, your follow-up email serves to give them a gentle nudge so that they re-engage with your brand. In the context of automated emails, your follow-up emails should trigger in response to your email recipient’s behavior. Abandoned carts, lead magnet downloads, newsletter subscriptions, free trial signups, and more are all fair game for follow-up emails. Regarding how often you should follow up with your customers, there’s no clear-cut answer. As a rule of thumb, aim to automatically send follow-up emails a few days after your initial confirmation email. For example, if a customer abandons their shopping cart, you can wait between three days and a week before following up with them. Meanwhile, if a customer’s behavior reveals that they need time to mull over whether to do business with you, play the long game. Program a longer series of emails with informative content like blog posts and case studies to nurture them until they come around. You can use ready-made AI templates like the one above to speed up the content creation process. 4. Implement hyper-personalizationHyper-personalization refers to email marketing that leverages insights from historical and real-time customer data and use them to deliver relevant and personalized content. For instance, in hyper-personalization, you’d send a male subscriber this email on the left. A female subscriber would receive the email on the right: 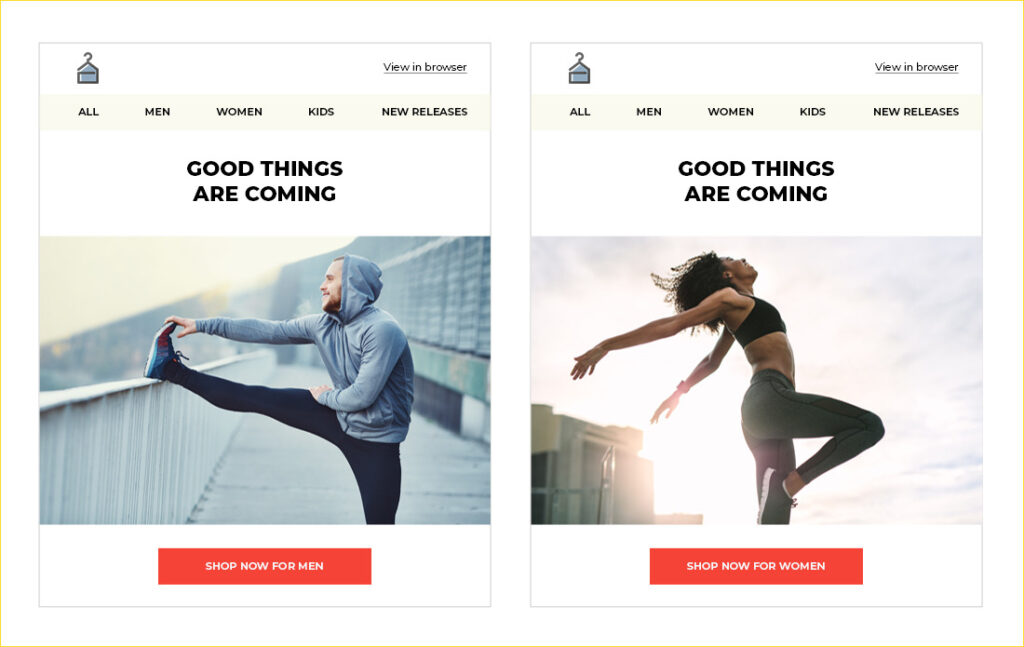
To leverage hyper-personalization in your automated email workflows, gather as much customer data. Collect their demographic information, previous purchases, interests, and browsing trends. For this, use tools such as surveys, preference centers, heat maps, and recording sessions. Your email marketing efforts can benefit from hyper-personalization in numerous ways. For one, it helps you create email content and personalized messages that resonate with your audience segments. When used with email segmentation, you can create dynamic content based on factors like your audience’s behavior and location. Also, hyper-personalization is great for customer engagement. It can help you tailor your communications in a manner that’s optimal for higher conversion rates. Thanks to AI-powered automation, you can speak directly to your customer’s needs and pain points at scale. Finally, hyper-personalization gives you a deeper understanding of your customers. This benefit is significant because it improves your email marketing chances in numerous ways. Not only will you get better at targeting customers, but you’ll also have the data needed to create a pleasant customer experience. Your customers will deem your emails as a source of valuable content. 5. Maintain consistent brandingWhen your email subscribers open your automated emails, they should instantly know that the email came from you. Brand recognition is key to business success. Half of consumers say they’d buy from a brand they easily recognize. To foster this familiarity, maintain consistent branding across your email and web properties. There are several ways to do it. The easiest method is to place your company logo in the profile picture section of your email account and the email’s header. As the image below shows, SaaS company ClickUp adheres to this best practice: 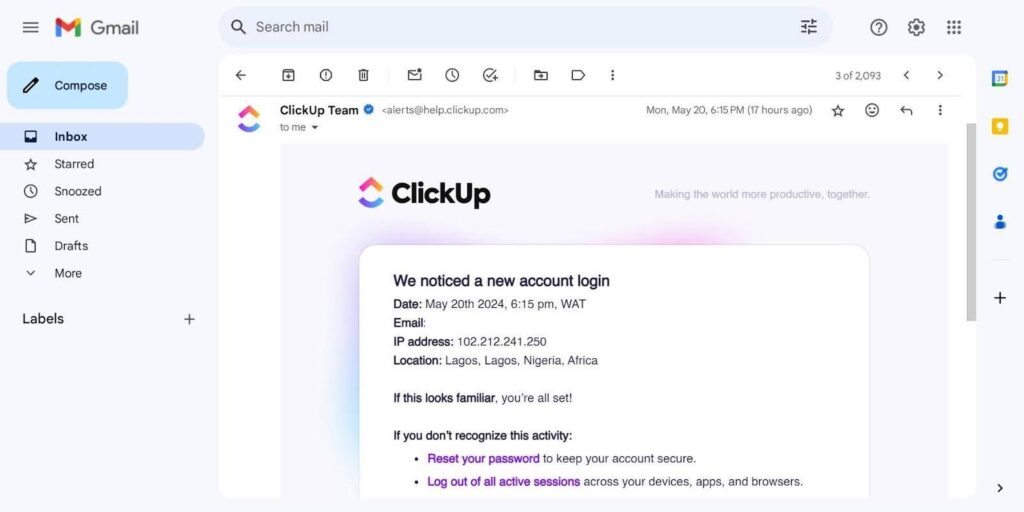
This email design technique ensures that your logo will be the first visual element your email contacts see when they open your emails. It’s also the lowest-cost method for building brand recognition with your email campaigns. Another effective method for maintaining brand consistency is to use the same design elements in your email as you do on your website. Incorporate the same fonts and color scheme in your email newsletters. This will prevent your potential customers from being confused when they visit your email and other web properties. 6. Continuously track performanceIt’s good practice to continuously track how your automated marketing emails are performing. Tracking performance provides a treasure trove of data you can rely on when planning future campaigns. One way to track performance is to run A/B tests on the various elements of your emails regularly. Send two sets of emails with different subject lines, layout designs, and call-to-action copy to two sets of audiences. Then, note down which version produces higher email engagement rates. While doing A/B tests, keeping track of success metrics will help you gauge your campaign’s performance. The key metrics to track include open rates, click-through rates, and conversions. You can analyze the results in your chosen email marketing automation software. Use the metrics to make data-driven decisions related to your workflows as part of your B2C or B2B strategies. You can also track campaign performance using email funnel conversion analysis. mail funnel conversion analysis tracks how customers move through your conversion funnel. With it, you can identify bottlenecks that cause subscribers to churn or impede their progress along their journeys. The data you get from this analysis will help you optimize your funnel for conversions. FAQsWhat is an automated email workflow?An automated email workflow is a series of emails that are automatically triggered and sent based on a subscriber’s specific action. That action can be everything from a link click to a form submission. Automated workflows can be a powerful tool in your overall email marketing strategy. Not only do they save you precious time. They also help you reach your business goals with minimal intervention. What are the benefits of email automation?Email automation workflows provide several benefits. For one, they help you respond to customer behavior appropriately. Also, email automation saves you time. It automates mundane and repetitive workflows (for example, welcoming new customers). Finally, automated workflows drive conversions. They help you personalize email communications and send them to audiences that find them relevant. What is the best email automation tool?There are several excellent options on the market, but we can confidently say that AWeber is among the top options. It offers all the features needed for automating email workflows. These include an email builder for design and behavioral automation features. Other great automation tools include HubSpot, ActiveCampaign, and GetResponse. How do I automate my email?Automating email campaigns is a five-step process. Step one involves choosing email automation software. The second step has to do with determining the goals for your automated campaigns. Your third step is to target and segment your audience. Step four involves deciding on email triggers. The final step involves creating email campaigns and activating them. In closingThe email automation best practices discussed should get your campaigns off to a flying start. Your email campaigns must incorporate follow-ups to bring disengaged customers back into the fold. Without goals, creating automated workflows will be a pointless endeavor. For best results, make sure to map them to the customer journey during the goal-setting phase. Meanwhile, hyper-personalization can help you gain actionable insights into your audience and drive customer engagement. Maintain consistent branding across your email, social media accounts, and website. This will ensure brand recognition. Automate trigger emails to ensure content gets sent at the right time and based on pre-specified user actions. Finally, consistently track your campaign performance. It will help you iron out any issues in your future campaigns. Good luck with your email automation journey! The post Email automation best practices for highly engaging campaigns appeared first on AWeber. via AWeber https://blog.aweber.com/learn/email-automation-best-practices.htm
0 Comments
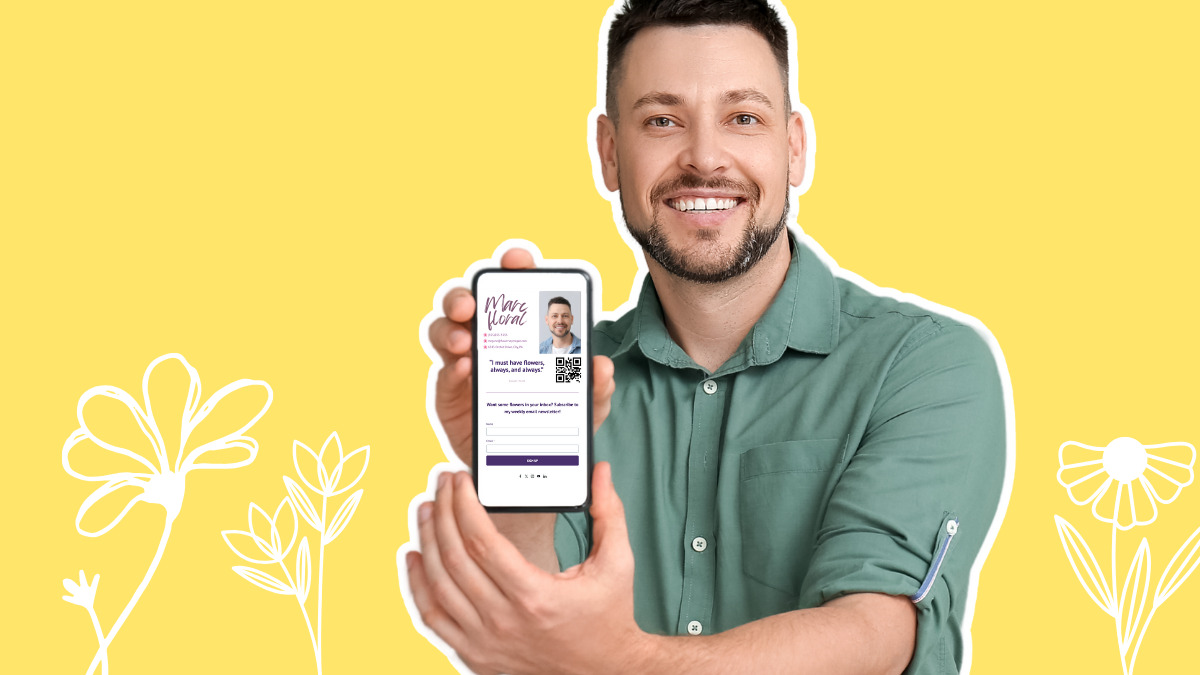
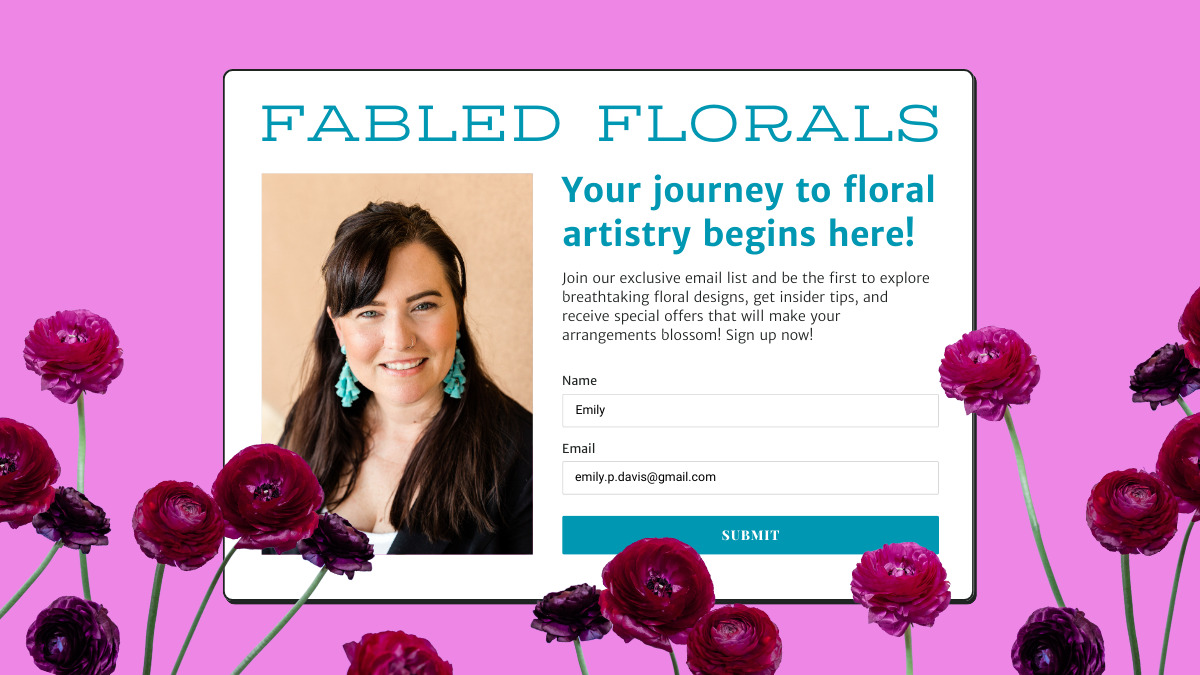
Creating a digital business card can be a game-changer for your networking and marketing efforts. With AWeber, you can easily design and share a professional-looking virtual business card. Here’s how: Step 1: Choose a Digital Business Card AppStart by selecting a digital business card app. AWeber offers a free, user-friendly virtual business card template that you can customize directly in your AWeber account. 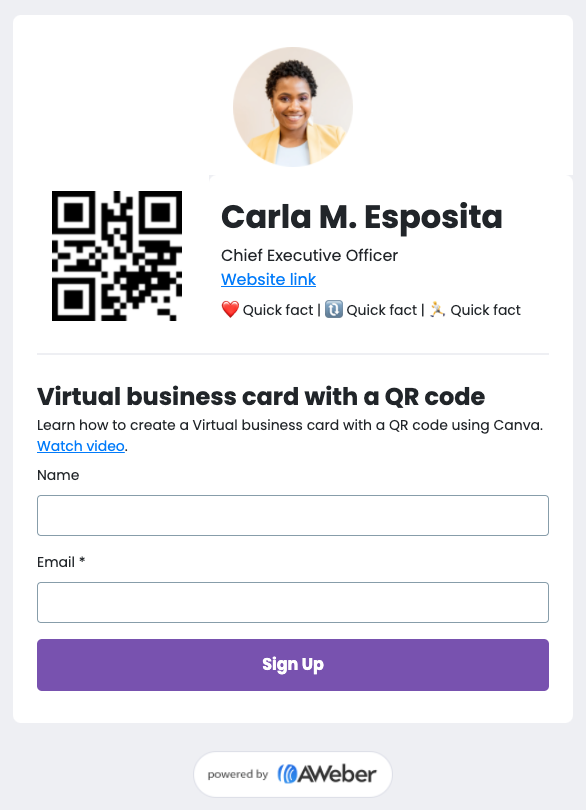
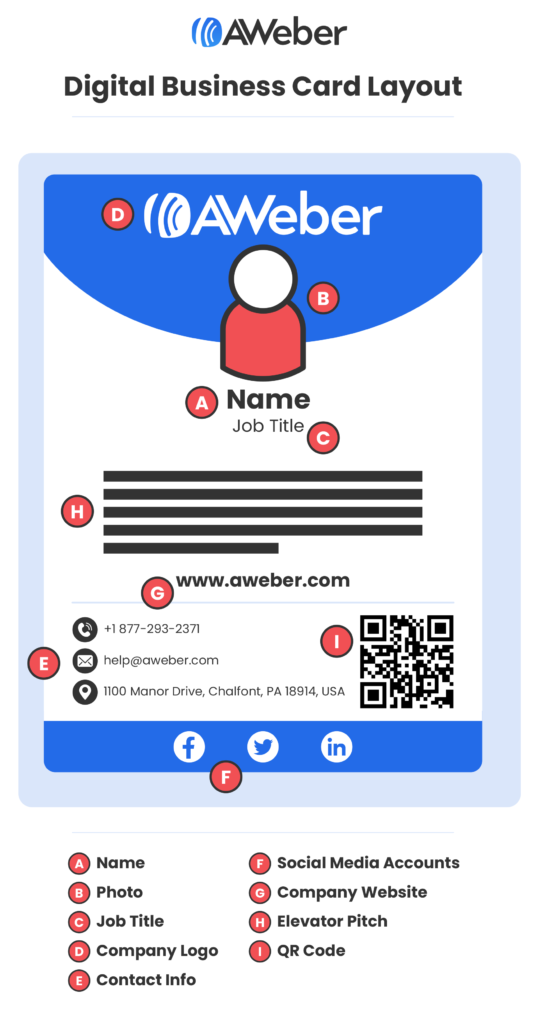
Step 2: Customize Your Digital Business CardOnce you've chosen a platform, fill in your card with essential details: Upload a photo: Add a personal touch with your image. Company logo: Insert your brand's logo. Job title and summary: Clearly state your role and a brief description. Contact information: Include phone number, email, and other key details. Social media links: Connect your audience with your Twitter, LinkedIn, Facebook, and other relevant profiles. Step 3: Add a QR CodeA QR code is essential for easy sharing. You can generate a QR code with Canva. Best of all, AWeber has a direct integration with Canva, so you can even add a custom QR code to your card with a simple drag and drop. Step 4: Include Key InformationPart of the beauty of digital business cards is that you can include as much (or as little) information as you’d like. Here’s the most commonly included information:
Step 5: Share Your Digital Business CardNow that you have a digital business card, it’s time to start sharing it. Here are some of the best ways to get your new virtual card into your potential clients’ hands. QR code: In-person or on your Zoom virtual background. Text or email: Send the link directly to new contacts. Email signature: Embed the link or a screenshot of your card. Direct link: Share it on social media or via messaging apps. Benefits of Using Digital Business CardsThese new cards are quickly becoming “the norm” in the business world, and for good reason. There are many benefits to creating a virtual business card for yourself. Convenient: Easily accessible on your device, no need for physical cards. Cost-effective: Free or inexpensive to create and update. Eco-friendly: Reduces paper waste. Seamless follow-up: Integrate with your mailing list for automatic follow-ups. Trendy: Stay up to date with modern networking practices. 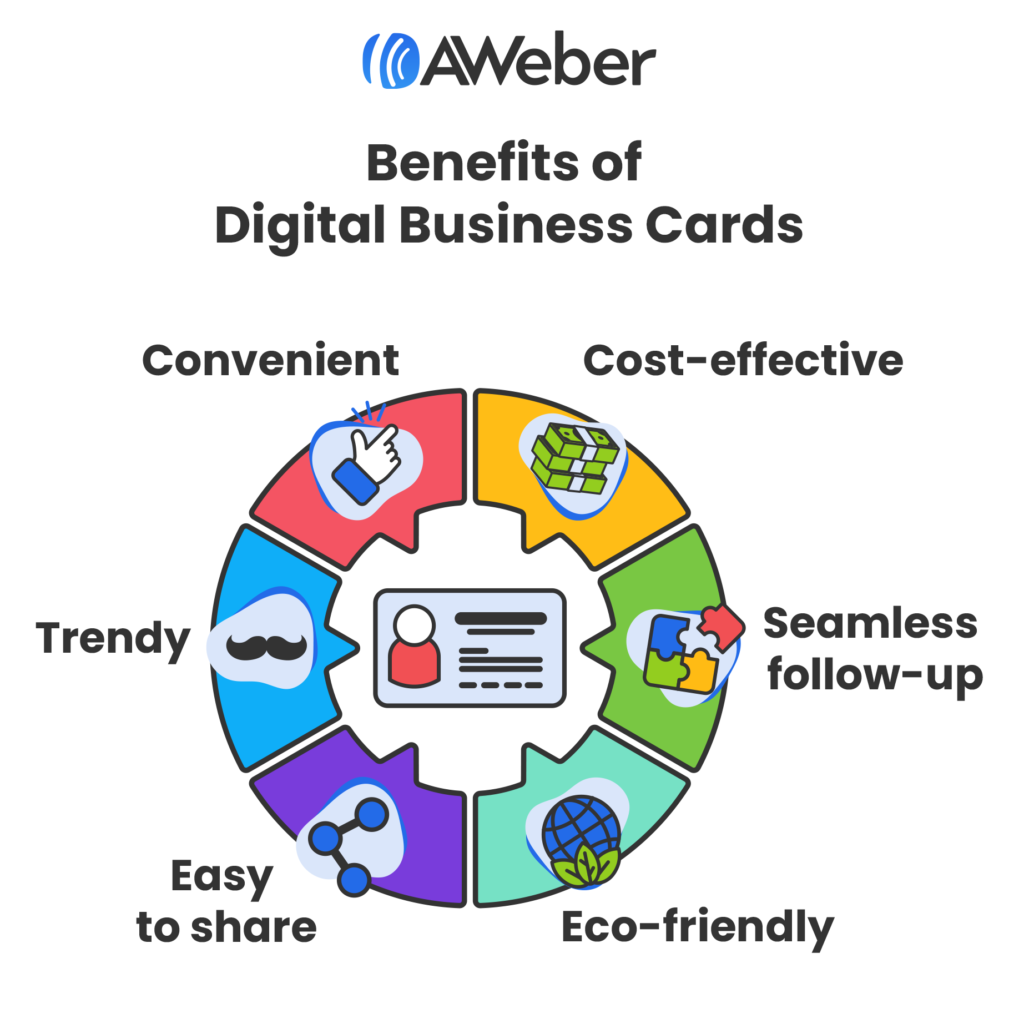
Get Started Today!Create your digital business card with AWeber’s virtual business card template and start sharing it effortlessly. Watch this video to see how easy it is to get started! Frequently asked questionsWhat is a digital business card?A digital business card (also known as a virtual business card) is a simple webpage with your contact information —including your name, email, website, socials, calendar link, contact form, and other information pertinent to you and your business. Like a traditional business card, you use it to share your contact information. However, a digital business card can contain an unlimited amount of information. Plus, it can be interactive and up-to-date on your most recent info. How Does a Digital Business Card Work?A digital business card functions as an interactive and easily shareable version of a traditional business card. It can be accessed via a link, QR code, or app and includes comprehensive information like contact info, social media links, and more. Users can quickly and easily share and update their card, so they always present up-to-date information to contacts. How to Create a Digital Business Card in Canva?To create a digital business card in Canva, start by signing in to your Canva account and searching for "business card" templates. Choose a template that matches your style and customize it by adding your personal information, logo, and other details. You can also include a QR code. Once that’s done, download your card as a digital file, like a PDF or image. How to Add a Digital Business Card to an Apple Wallet?To add a digital business card to Apple Wallet, first create your digital card using a compatible platform or app. Export your card in a format supported by Apple Wallet, usually a PKPass file. Then, open the file on your iPhone, and choose "Add to Wallet." Your digital business card will now be available in the Apple Wallet app for easy sharing and retrieval. The post 5 Steps to create a digital business card for easy follow up appeared first on AWeber. via AWeber https://blog.aweber.com/learn/digital-business-card.htm
Developing a strong unique selling proposition (USP) is one of the best ways to elevate your marketing efforts. Not only does it help define your overall strategy, but it also makes all your marketing endeavors more effective. What is a Unique Selling Proposition?A USP answers two critical questions:
Your USP should be a concise sentence or phrase that clearly explains why your business stands out. It’s the essence of what makes your business unique. 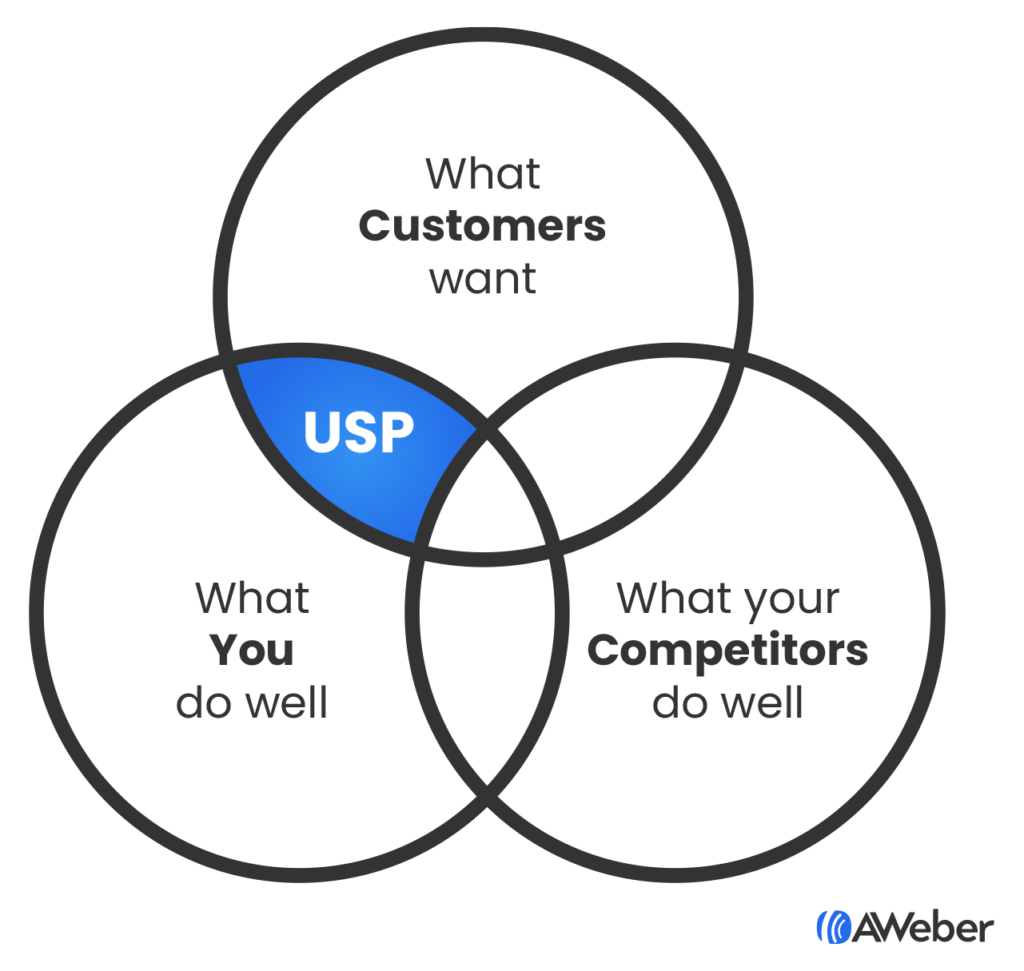
Characteristics of a strong USP1. Authentic to your businessYour USP must be rooted in what your business genuinely excels at. It’s not enough to simply claim superiority; your USP should reflect a true strength or focus of your business. For instance, if you run a pizza place, claiming "We're the best" isn’t enough. However, if your pizza place is renowned for using organic, locally sourced ingredients, your USP could be "Farm-fresh ingredients in every slice." This authenticity builds trust with your customers. They need to know that what you promise in your USP is what they will experience. A genuine USP is more sustainable because it aligns with your company’s mission and values. 2. Customer-focused promiseA USP should address your customers’ needs and highlight a key benefit. Whether it’s your exceptional product quality or world-class customer service, your USP should communicate what sets you apart in a way that resonates with your ideal customers. For example, if your business prides itself on fast delivery, your USP could be "Hot pizza at your door in 30 minutes or less." It’s important to understand your customers' pain points and how your business addresses them. A good USP is less about the product and more about the solution it provides. If your unique offering is an exceptional customer experience, make sure that’s evident in your USP. 3. Distinct from competitorsA good USP leverages the principle of positioning, clearly articulating how your business is different from competitors. It highlights your competitive advantage and helps position your company in the minds of potential customers. For example, if you own a coffee shop in a crowded market, your USP might be "The original craft coffee experience since 1966." This distinctiveness is crucial because it helps your business stand out in a crowded marketplace. Your USP should succinctly convey why a customer should choose you over your competitors, emphasizing your unique value proposition. 4. Memorable and conciseYour USP should be short and memorable. It should be a statement that encapsulates your company’s identity and can be reflected in all your marketing and communications. A concise USP is easier for customers to remember and recall, which is essential for brand recognition. For instance, Apple's "Think different" is a succinct and memorable USP that encapsulates the brand's innovative spirit. Finding your USPTo uncover an effective USP, consider the following questions: What product or service are you selling?Clearly define what you offer. If you’re an affiliate, what businesses or products are you promoting? Knowing exactly what you are selling helps in identifying your unique angle. What unique features and benefits does it offer?List out the features and benefits that set your product or service apart. This could include quality, speed, customer service, or unique ingredients. Who is your target audience?Define your ideal customer. Who are they? What are their demographics and psychographics? Knowing your audience helps tailor your USP to their specific needs and desires. What are their key pain points?Identify the main problems your target customers face. Understanding these pain points is crucial as your USP should address how your product or service solves these issues. How does your product or service address these pain points?Explain how your offering specifically alleviates the pain points of your customers. This is where the core of your USP will come from. Who are your competitors and what are their USPs?Research your competitors. What are they claiming as their unique selling points? This knowledge helps you position yourself distinctively. What do you do better than your competitors?Highlight what you excel at compared to others in your industry. This could be better quality, faster service, more personalized attention, etc. How do you run your business differently?Describe any unique processes or methodologies your business employs. This could include sustainable practices, unique supply chains, or innovative technologies. How do you treat your customers differently?Emphasize your customer service approach. Do you offer 24/7 support, personalized follow-ups, or a satisfaction guarantee? How would you answer a customer who asks, “Why should I buy from you?”Craft a direct response to this question. This will help you distill your thoughts into a clear and compelling USP. Crafting and using your USPOnce you have your answers, distill them into a brief statement that captures what makes you different. This is your USP. Here’s how to implement it effectively: Make It visibleDon’t just leave your USP in your notebook. Put it everywhere so it stays top of mind. Make it your computer and cellphone background. Frame it on your desk. Sign it at the bottom of your emails. Ensure it’s visible on your website, marketing materials, and even your office space. This constant visibility reinforces your brand’s unique position in the minds of your team and customers. Live it dailyEven more importantly, live it. Breathe it. Make everything you do and how you do everything embody that USP. Make it as much a focus of your daily work as your mission statement or your business’s financial goals. Your actions should consistently reflect the promises made in your USP, creating a cohesive and authentic brand experience. Examples of effective USPs1. Canva: Online Design Made EasyCanva simplifies design, making it accessible to everyone. Their USP is evident in their user-friendly interface and comprehensive design tools. Canva's promise of ease is reflected in every aspect of their service, from their intuitive drag-and-drop features to their extensive library of templates. 2. Buffer: All-You-Need Social Media Toolkit for Small BusinessesBuffer addresses the pain point of tool overload by providing an all-in-one solution for small businesses. By consolidating multiple functions into one platform, Buffer simplifies social media management, making it more efficient for small business owners. Their USP clearly targets a specific audience, ensuring they attract the right customers. 3. Product Hunt: The Best New Products in TechProduct Hunt’s platform surfaces the best new tools through community voting. Their USP is rooted in their mission to highlight innovation in tech. By allowing users to vote on new products, Product Hunt leverages social proof to validate their selections, making their USP both unique and credible. 4. Nike: Just Do ItNike's USP centers on the themes of motivation, inspiration, and empowerment. The brand's marketing and product design emphasize the idea that with the right gear, anyone can surpass their goals and unlock their full potential. This approach not only highlights the functional benefits of Nike's offerings but also connects with customers on an emotional level, making them feel empowered and inspired to strive for excellence in their athletic endeavors. 5. REI: A Life Outdoors is a Life Well LivedREI’s USP encapsulates its commitment to the outdoor lifestyle, beyond just selling products. They offer trips, classes, and a vast library of articles about outdoor life. REI’s USP resonates with their audience's passion for the outdoors, positioning them as more than just a retailer but as a lifestyle brand. 6. Peet’s Coffee: The Original Craft CoffeePeet’s emphasizes its long history and authenticity in the craft coffee movement. Their USP, "The Original Craft Coffee," speaks to their pioneering role in the industry. This not only differentiates them from newer competitors but also appeals to customers who value tradition and quality. Your turnA well-defined USP can set your business apart and attract your ideal customers. By answering the right questions and staying true to what makes your business unique, you can craft a USP that not only differentiates you from competitors but also resonates deeply with your target audience. Once crafted, make your USP a central part of your business strategy and daily operations to maximize its impact. By understanding your strengths, focusing on your customers’ needs, and clearly differentiating yourself from competitors, you can create a USP that drives your marketing success and solidifies your brand’s position in the market. Embrace your uniqueness, communicate it effectively, and let your USP guide your path to business growth and customer loyalty. The post 6 Examples of a unique selling proposition and how to write your own appeared first on AWeber. via AWeber https://blog.aweber.com/learn/unique-selling-proposition.htm
The creator economy is a growing sector where individuals use digital platforms to create and share content, build communities, and, ultimately, make money. In 2024, the creator economy is valued at a whopping $250 BILLION and is expected to nearly double by 2027. This booming sector offers unprecedented opportunities for creators who know how to navigate this dynamic and evolving market. But how do you know you’re doing it right? Things change fast, and staying informed of the industry's latest best practices can be a full-time job. To help you navigate your way to the top of the creator economy, we reached out to eight experts. Each one of them knows the ins and outs of the creator economy, so we asked what they think the best moves are for content creators in the next 6 - 12 months. Specifically, we asked them four major questions: 1. How concerned are you about the economy in the next 6 - 12 months, especially for creators? How worried are they?Surprisingly, the experts we talked to aren’t losing any sleep over fears of the creator economy tanking any time soon.
The average score of everyone’s rating for how concerned they are? Just 2.9 out of 10. Just check out this word cloud of their answers: 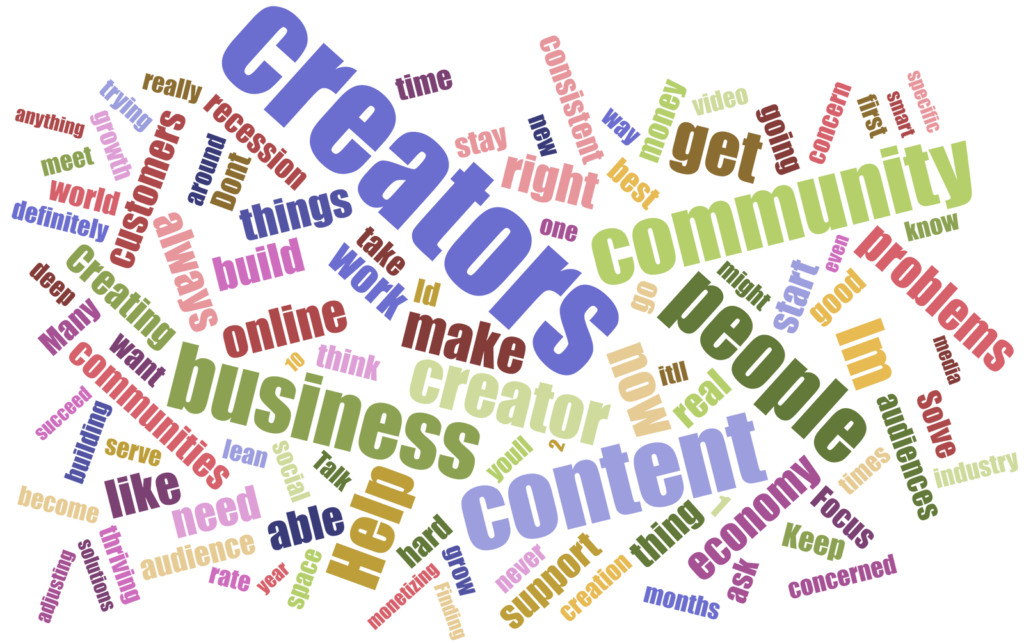
What stands out? Creators, sure. Content, yep. What else? Community. Help. Support. Audience. People. Across the board, every one of our experts gave pretty much the same advice: build a community. Find a group of people who genuinely appreciate and value your work. Get to know that community really, really well. Connect to them.Then – and only then – offer them paid solutions and support for those problems. Why “focus on building a community” is great advicePeople who are well-connected, visible, and contribute to communities tend to have more opportunities. The people they are connected to “know, like, and trust” them, so they’re aligned with that golden rule of sales and marketing. They get more work, even in downturns. And they’re well-enough connected to know when and how to pivot if that becomes necessary. Those are the key takeaways from the answers we got: Most of these creators/advisors aren’t very worried about how creators will fare in 2022, and they recommend every creator focus on building a specific audience/community.
|


 RSS Feed
